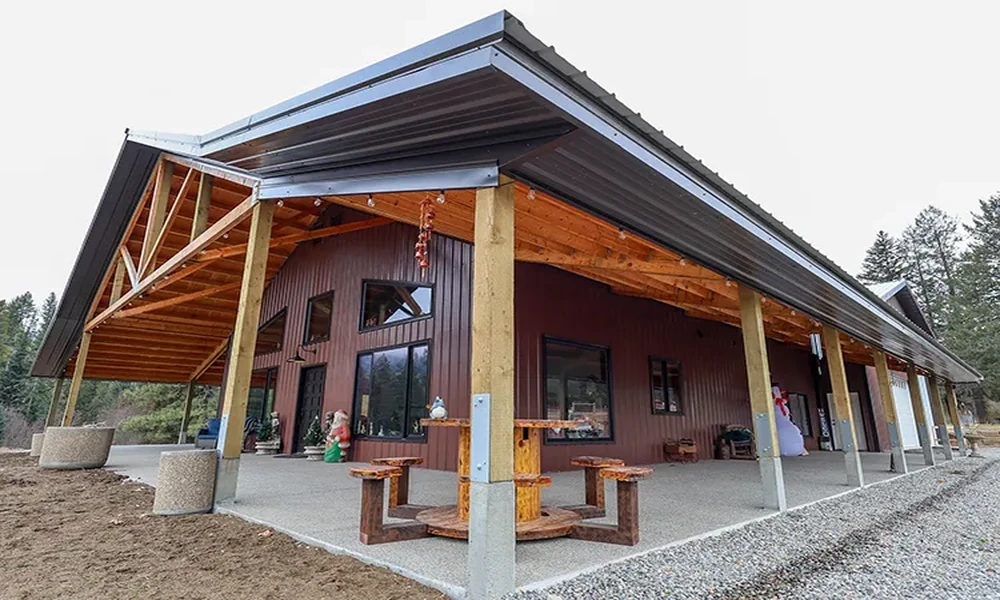
Post frame construction has moved well past the farm. Across Northern Michigan, the building method once used for hay storage now shelters RV collections, heated woodshops, four car garages and, more and more, full time homes sold under the barndominium label. The appeal is easy to see. Widely spaced columns carry the roof, so you get long clear spans, few interior walls and a frame that goes up faster than conventional stick framing.
What the finished building rarely shows is how much carpentry is stacked inside it. A pole barn is a chain of decisions, each resting on the layer below, and a mistake at any level tends to travel. An undersized purlin shows up as a wavy roof line. A post treated for the wrong exposure shows up ten years later as rot at grade. Looking at the structure from the top down is the clearest way to see where the real judgment calls are.
Snow drives most of those calls in this part of the state. Lake effect bands, long winters and repeated freeze and thaw cycles test a roof frame far harder than a mild climate does. The building has to be designed for the load at its actual address, not a generic number pulled from a kit catalog.
For owners around West Branch, Grayling and the surrounding Northern Michigan communities, Best Carpenters Group is a practical place to start, because the same crew that frames pole barns, custom garages and barndominiums also handles the roofing, siding, gutters and window and door work that finishes them. One team means the steel, the framing and the trim all sit under a single workmanship guarantee instead of three separate contracts. If a shop or barn home is on your list for next season, booking a free estimate now leaves time to settle the design before spring material orders stack up.
Here is a quick map of the seven layers before going through each one.
| Layer | Common options | What decides it | Late warning sign |
|---|---|---|---|
| Roof steel and ridge | Exposed fastener panels, standing seam | Budget, use of the building | Leaking screw heads, rust streaks |
| Under the steel | Drip stop fleece, sheathing with underlayment | Heated or unheated interior | Dripping in cold mornings |
| Trusses and purlins | 4 ft or 8 ft truss spacing | Site snow load, span | Sagging between trusses |
| Girts and openings | Flat girts, bookshelf girts | Interior finish plans | Bowed walls near big doors |
| Columns | Solid sawn, nail laminated | Height, straightness | Twisting, deep checks |
| Wood at grade | Embedded treated posts, brackets on piers | Soil, treatment level | Soft wood at the ground line |
| Footings and slab | Precast pads, insulated slab | Frost depth, heating | Cracked slab, doors that bind |
1. Roof Steel and the Ridge
Most post frame roofs are ribbed steel panels screwed straight to purlins. Panel gauge matters for hail and foot traffic, but fastening matters more. Screws placed in the flat of the panel seal better against wood than those driven through the rib, and the rubber washers under each head age in sunlight long before the steel wears out. Many owners find a round of screw replacement is due well before the roof itself.
Hidden fastener standing seam has become a popular upgrade on barndominiums because there are no exposed washers at all. Snow behavior also changes the plan. Steel sheds snow suddenly, so overhead doors on the eave side can get buried, which is why many builders put main doors on the gable ends or add snow guards above entries. At the peak, vented ridge closures let moist air escape where solid foam closures would trap it.
2. The Layer Directly Under the Steel
Bare steel cools fast on clear nights, drops below the dew point and drips. In an unheated machine shed that might only mean wet equipment. In a heated shop or a living space, it means stained ceilings and wet insulation.
The usual defenses are a factory applied fleece membrane that holds droplets until they evaporate, a reflective insulation layer, spray foam, or full sheathing with synthetic underlayment for buildings people will live in. A fresh concrete slab adds its own burden, since curing concrete releases a surprising volume of moisture during its first winter. A vapor retarder under the slab and good ventilation through that first season ease the load considerably.
3. Trusses and Purlins
Trusses usually land at 8 feet apart so they sit directly on columns, or at 4 feet with a carrier beam between posts. Wider spacing asks more of the purlins, which is why 2×6 purlins set on edge or hung flush in hangers have largely replaced flat 2x4s on heavier snow sites.
Design loads should come from the property itself. The site specific snow load lookup from the American Society of Civil Engineers returns a ground snow value for any address, and the most recent edition of the standard reworked how those values are mapped. The local building department can still require a higher minimum, so the stamped truss drawings need to match whatever it adopts. Lean tos deserve extra attention, because the step down where a lower roof meets a taller wall is exactly where drifting snow piles up.
4. Girts, Wall Steel and Openings
Girts are the horizontal members running between columns that carry the wall steel. Flat girts on the outside of the posts are the economical standard. Bookshelf girts, set flush between columns, give a smooth interior plane for insulation and drywall, which is why barndominium builders favor them.
Large openings are where wall framing earns its keep. A 16 foot overhead door needs a stout header and often a truss carrier above it, and the columns on either side take concentrated wind load every time the door is open. Window and door openings need properly framed bucks so trim and flashing have something solid to tie into, and a weather barrier behind the steel matters on any building that will be heated.
5. The Columns
Old barns used solid sawn timbers. Most current builds use nail laminated columns made from three plies of 2×6 or 2×8 lumber. Laminated columns stay straighter, check less as they dry, and can be built with treated lumber only at the bottom and untreated material above, joined by engineered splices.
Column height, spacing and the splice location all come from the structural drawings rather than field guesswork, and taller sidewalls for RV doors push those numbers up quickly.
6. Where Wood Meets the Ground
This is the layer that most often decides how long the building lasts. Embedded posts need a treatment level rated for ground contact, and the preserved wood use category chart from the American Wood Protection Association lays out the difference between above ground and ground contact ratings. Building posts are typically expected to meet the heavy duty tier, while many retail posts carry only the general ground contact rating, so the end tag deserves a close look.
A growing alternative keeps wood out of the soil entirely, using wet set brackets in poured piers or precast concrete column bases that rise above grade. Either way, uplift resistance belongs in the plan, whether through concrete collars or cleats that lock each post into its footing.
7. Footings, Frost and the Slab
Every column needs a footing pad set below the frost depth the local building department requires. Sandy soils across much of the northern Lower Peninsula drain well, but heave still happens wherever water collects near a post.
Slabs are becoming the most engineered part of the build. Rigid foam under the concrete, an insulated perimeter and in floor radiant tubing laid before the pour are now common in heated shops and barn homes. Grading the site away from the walls and adding gutters to keep roof runoff off the lower girts protects every layer stacked above.